Quantizing a Diffusion Model using Quark#
NOTE This tutorial can be downloaded for local execution on a Jupyter Notebook environment. Click here to download the source file.
In this tutorial, we will be quantizing Stable Diffusion using AMD Quark. Stable Diffusion model is a text-to-image latent diffusion model by Stability AI. Other popular examples include OpenAI’s DALL-E, and Google’s Imagen.
This tutorial follows after AMD Quark’s Quickstart tutorial, and is designed for users who have a basic understanding of the fundamentals of AI and Pytorch, and would like to learn more about quantization using Hugging Face image generation models.
Please note that this tutorial requires a GPU compatible with ROCm or CUDA to run. Diffusion models require a lot of compute to make them run within a reasonable timeframe, and without a GPU to speed up the process using parallel processing, the scripts can either crash or take more than an hour to run a single generation.
What You Will Learn#
PyTorch installation with ROCm/CUDA compatibility for parallel processing.
Diffusion model background.
Hugging Face pipelines.
Image generation using Hugging Face models.
Quantization of Hugging Face models.
Comparing quality degradation through image generation quality.
Exporting using ONNX.
Displaying the ONNX model using Netron.
Installation and Set-Up#
We will be using a Python environment for this tutorial to install PyTorch and Quark. Please refer to the Installation Guide for further information on setup. If you are using a Windows computer, it is recommended to use Ubuntu through Windows Subsystem for Linux (WSL). You can refer to the Quickstart tutorial for more details.
Let’s install some of the necessary packages for the tutorial:
pip install accelerate diffusers huggingface_hub ipython matplotlib netron notebook pillow safetensors transformers
If you are using GPUs compatible with ROCm (AMD GPUs), you can install the PyTorch version below to accelerate runtime. You should check PyTorch’s installation page for instructions on installing an up-to-date version for your system. For example, we used ROCm 6.2.4 in this tutorial, which we installed as follows:
pip install torch torchvision torchaudio --index-url https://download.pytorch.org/whl/rocm6.2.4
If you are using GPUs compatible with CUDA (NVIDIA GPUs), you can install the below version instead. This tutorial uses CUDA 12.6, but feel free to swap it out for a different version.
pip install torch torchvision torchaudio --index-url https://download.pytorch.org/whl/cu126
You can also install the requirements necessary to run Quark with the below:
pip install amd-quark
By default, Hugging Face uses paths stored in environment variables
HF_HOME as the location to cache downloaded models and datasets,
respectively. You can set these environment variables to specify your
own paths. By default they will be under ~/.cache/huggingface/.
Now that we have installed all our necessary packages, let’s get some intuition regarding how diffusion models work.
Diffusion Model#
Diffusion Model Fundamentals#
A diffusion model iteratively adds Gaussian noise to images to create training data, and trains a neural network (a.k.a. a machine learning model) on how to undo the noise. By denoising the data we can recover the information back from our original image and create new images that are very similar to the original input.
Forward Noising Process#
The process of adding noise to the image is called the forward noising process. This process does not require training; we can just sample a pattern of Gaussian noise and add it to the image until we have a series of increasingly more noisy images across a given timeframe. The noise in the image can be thought of as a lack of original information or data about the original image, and the remaining image can be thought of as the remaining information left about the image.
Backward Denoising Processs#
Then, we can train a neural network to reverse the noise using a type of
model called a U-Net. For example, at a certain point in the forward
noise process, timestep T=3, we could have 80% noise and 20% image.
The aim of the neural network is to predict the entire noise to be
removed in a given timestep, back to 100% image. By reversing this
noising process, we regain back information from the original image, but
not all of the original data can be retained. This results in slight
differences from the source data as it is a probabilistic process,
resulting in new images to be generated. The below image is an example
of the diffusion process for a simple model across a series of
timesteps.
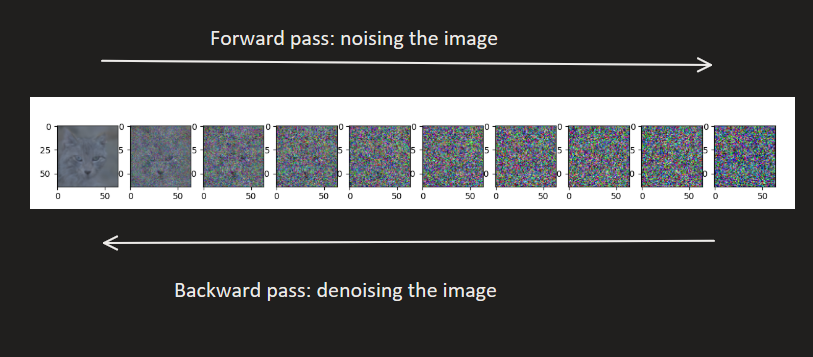
forward_back_pass#
Model Components#
The diffusion model we will be quantizing in this tutorial is Stable Diffusion, available for download on Hugging Face
Stable Diffusion is an image generation model capable of creating images from text prompts, as below:

rabbit_prompt1#
It is a Latent Diffusion Model that uses a fixed and pretrained text encoder CLIP-ViT/L as suggested in the Imagen paper, an autoencoder and a U-Net model.
U-Net Model#
The U-Net model is a type of convolutional neural network model (CNN). It firstly downsamples the image, which extracts the features and shrinks it in size while keeping the important information. Eventually, a bottleneck is reached. The bottleneck ensures the model only learns the most important features in the network by abstracting the features. Then, the upsampling occurs, which increases the resolution of the image output.
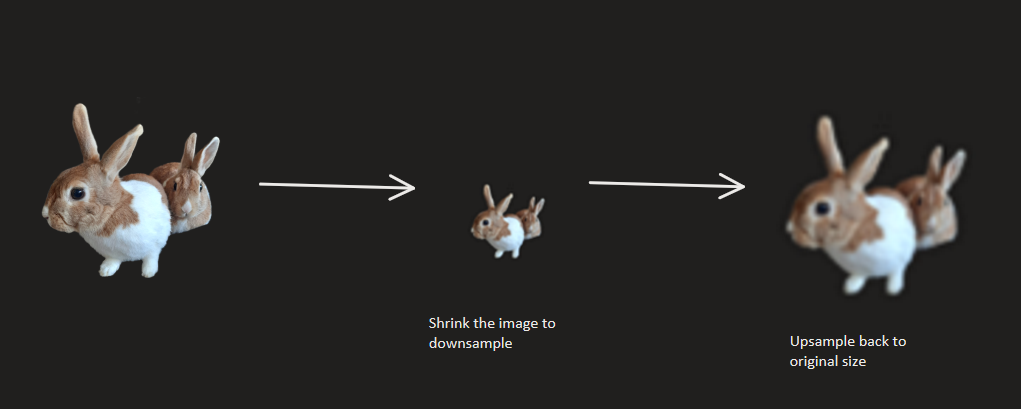
upsample_downsample#
Text Encoder#
The text encoder helps the model capture the semantic meaning of the prompt the user enters. It converts the text prompt into a vector representation as an input for the diffusion model to use during image generation.

text_encoder1#
Auto Encoder (AE)#
An autoencoder is a generative model that learns the distribution of the
image data learned from the same data inputted into the U-Net model by
mapping it to a lower representation of the data point using an encoder
into latent space, then using autoecoder to map it back into the
original data. The autoencoder in this model uses a downsampling factor
of 8 to map the images of shape H x W x 3 to latents of shape
H/f x W/f x 4.
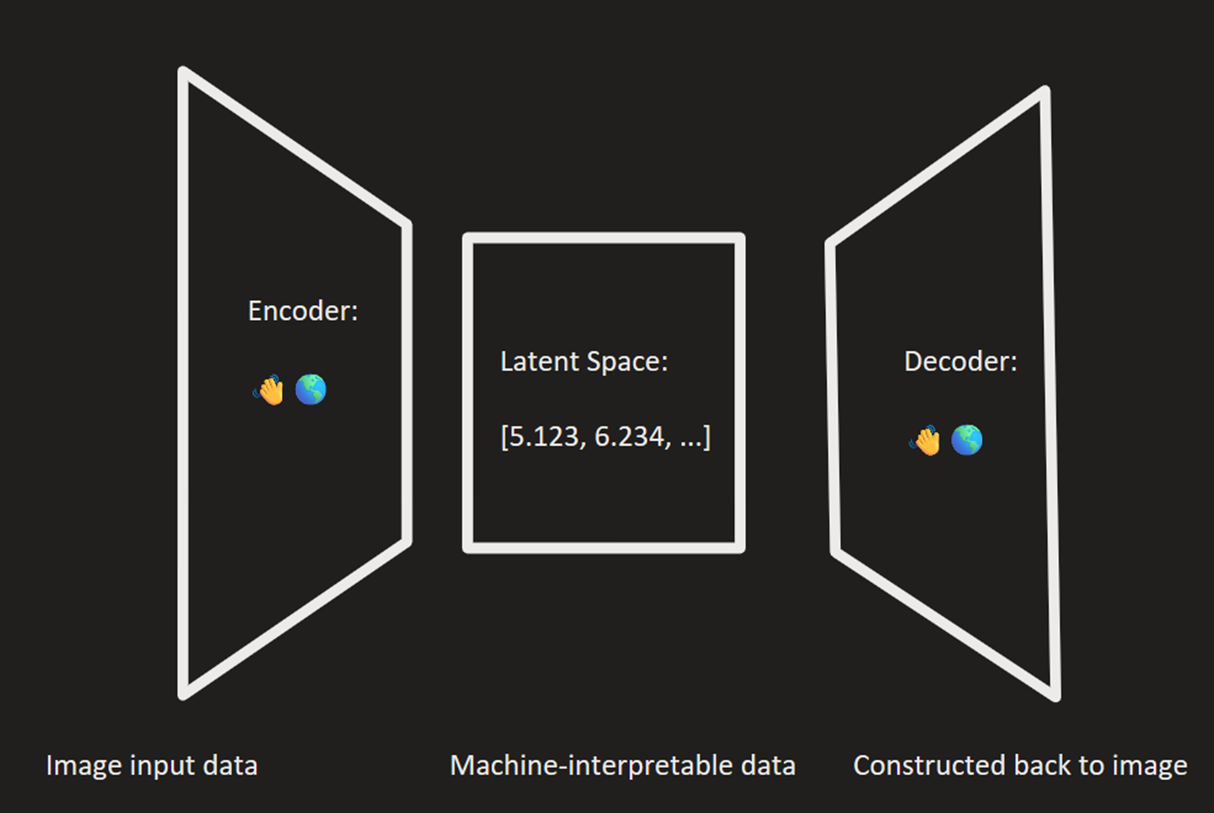
autoencoder_diagram2#
Model Implementation & Code#
Now, let’s download the diffusion model and test it with a prompt. Other
diffusion models are available for download and use on Hugging
Face. We will be using a smaller image
generation model, Stable Diffusion x1
base.
If you have a GPU on your machine that supports AMD
ROCm
or NVIDIA CUDA, the runtime
will be much faster, as the parallelization support with the device set
to gpu will allow the model to generate and be quantized
efficiently.
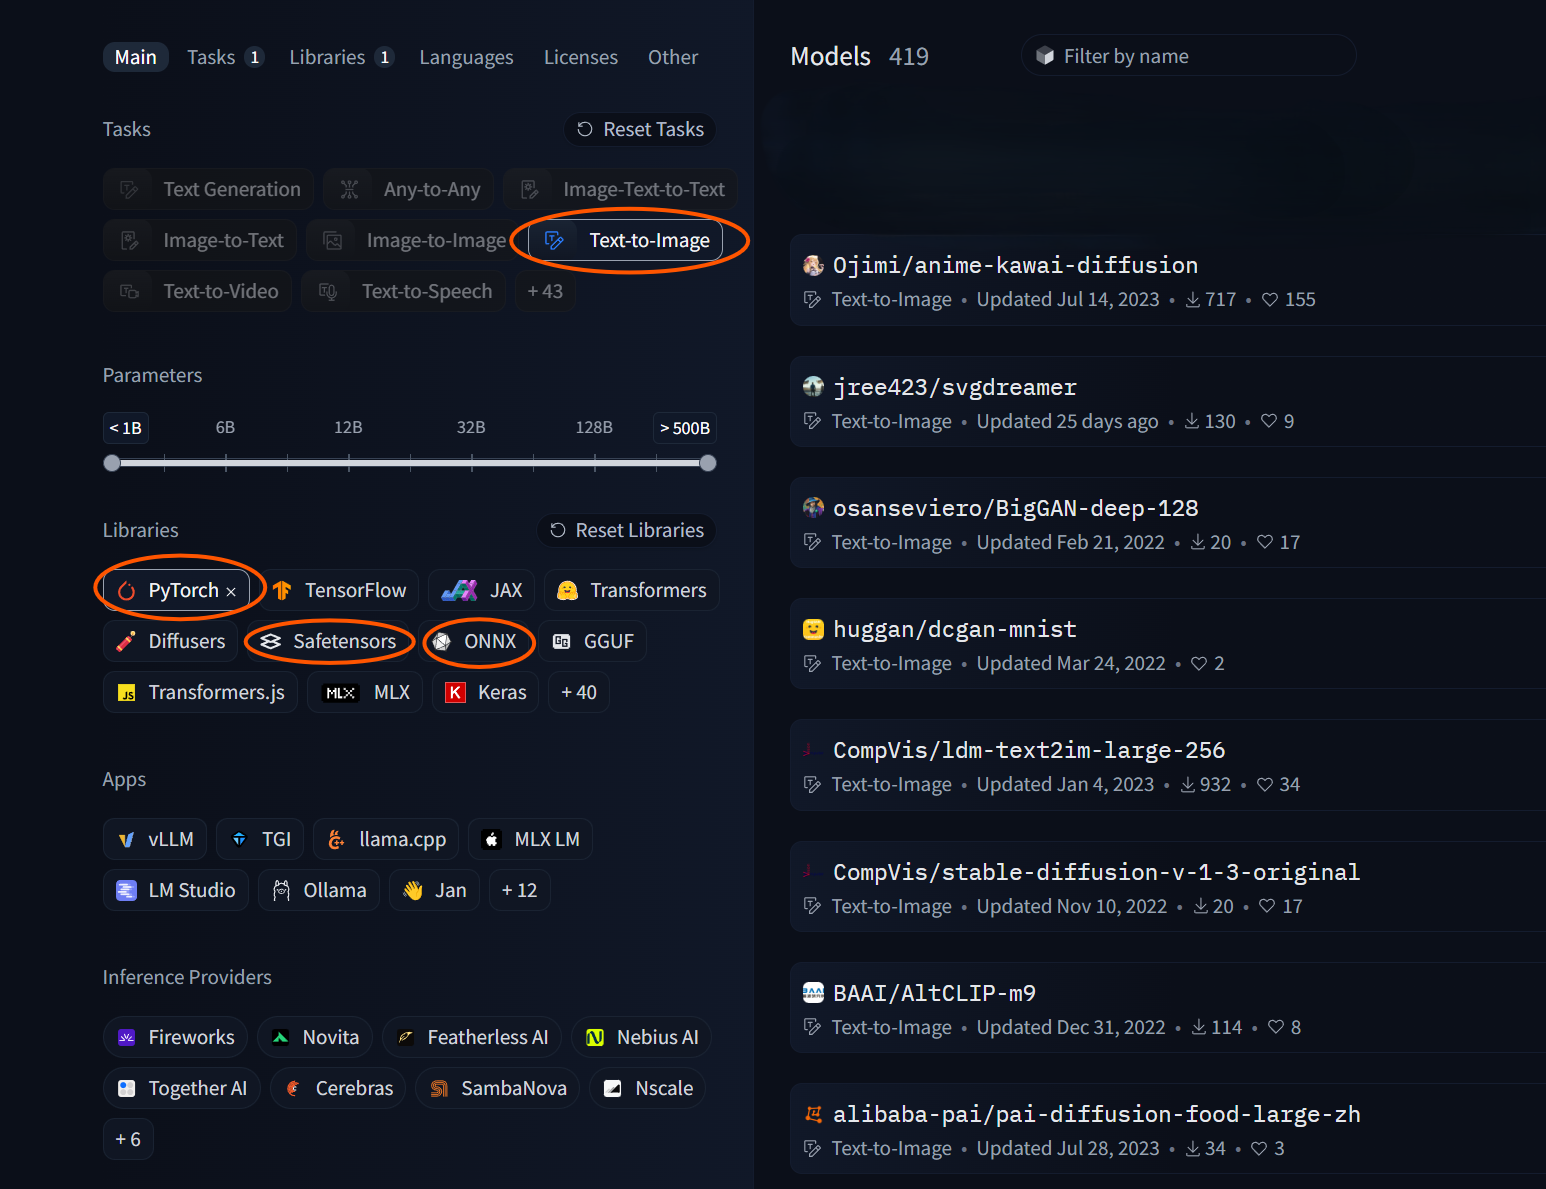
Feel free to swap out the model_id variable for another diffusion
model. You can navigate to
huggingface/models and select the
Text-to-Image filter from the tasks filter. Make sure the model you
select is still a diffusion model and not a different model such as a
Generative Adversarial Network (GAN). Additionally, ensure that there is
support for PyTorch, SafeTensors and ONNX in your model by selecting the
filters as shown in the diagram below.
Filtering for model parameters is a good way to filter by model size,
with the smaller the number of parameters being a smaller model. If the
code is too slow to run, you can request access for a smaller model such
as stabilityai/stable-diffusion-3.5-medium.
model_selection#
Then, you can click on the model name to navigate to the model page. Click on the copy symbol to copy the link to the model for download as below:

copy_model_name2#
And swap out the model_id variable for the model name you just
copied. Please note that if you change the model for use in this
tutorial, you may have to change the input tensor for exporting to ONNX
format later.
When the model downloads, you can see the different parts of the diffusion model as described in the previous section, including the encoders and U-Net.
import torch
from diffusers import StableDiffusionPipeline

model_id = "sd-legacy/stable-diffusion-v1-5"
pipe = StableDiffusionPipeline.from_pretrained(model_id, torch_dtype=torch.float16)
device = "cuda" if torch.cuda.is_available() else "cpu"
pipe = pipe.to(device)

print("Creating images...")
num_images = 3

prompt = ["A rabbit in a flower meadow"] * num_images

generator = torch.Generator(device).manual_seed(1024)

images = pipe(prompt=prompt, num_inference_steps=50, guidance_scale=7.5, generator=generator).images
Now, let’s create a function to display our images:
# Display images
from PIL import Image


def image_grid(imgs, rows, cols):
    assert len(imgs) == rows * cols

    w, h = imgs[0].size
    grid = Image.new("RGB", size=(cols * w, rows * h))
    grid_w, grid_h = grid.size

    for i, img in enumerate(imgs):
        grid.paste(img, box=(i % cols * w, i // cols * h))
    return grid


grid = image_grid(images, rows=1, cols=3)
grid
You can save your images by running the below line:
grid.save("rabbit-original-fp16.png")
Now that we have successfully downloaded our model and generated a sample image, let’s get started with quantizing our model. We will be using AMD’s Quark Quantization library to quantize our model.
Quantization#
If you are not already familiar with quantization, please refer to
Quark’s Introduction to
Quantization page.
Essentially, quantization compresses models by changing the model data
types into a lower precision. Currently, our model uses fp16 (16-bit
floating point) data type, as seen above when we downloaded the model
from Hugging Face. We will be extracting the U-Net model from our
diffusion model and quantizing it to int8 (8-bit integer).
We can create a spec for our quantization method. As we are doing
int8 quantization, we need to create a spec from the
Int8PerTensorSpec using the default parameters. Feel free to change
the parameters and see how they affect the quality of the images
generated by our model!
If you are unfamiliar with int8 quantization in Quark, you can see
more information with an LLM example using HF models here: Getting
started: Quark for
PyTorch.
You can also see how simple quantization methods are performed at a bit
level here: Introduction to
Quantization, which
will give further intuition regarding the parameters in our
DEFAULT_INT8_PER_TENSOR_SYM_SPEC.
from quark.torch.quantization import Int8PerTensorSpec
from quark.torch.quantization.config.config import QConfig, QLayerConfig

DEFAULT_INT8_PER_TENSOR_SYM_SPEC = Int8PerTensorSpec(
    observer_method="min_max", scale_type="float", is_dynamic=False, symmetric=True, round_method="half_even"
).to_quantization_spec()

DEFAULT_W_INT8_PER_TENSOR_CONFIG = QLayerConfig(weight=DEFAULT_INT8_PER_TENSOR_SYM_SPEC)
quant_config = QConfig(global_quant_config=DEFAULT_W_INT8_PER_TENSOR_CONFIG)
Alternatively, if you would like to try fp8 quantization, try
running the below code:
from quark.torch.quantization import FP8E4M3PerTensorSpec
from quark.torch.quantization.config.config import QConfig, QLayerConfig

DEFAULT_FP88_PER_TENSOR_SYM_SPEC = FP8E4M3PerTensorSpec(
    observer_method="min_max", scale_type="float", is_dynamic=False
).to_quantization_spec()

DEFAULT_W_FP8_PER_TENSOR_CONFIG = QLayerConfig(weight=DEFAULT_FP88_PER_TENSOR_SYM_SPEC)
quant_config = QConfig(global_quant_config=DEFAULT_W_FP8_PER_TENSOR_CONFIG)
In this tutorial, we will be quantizing the weights of the U-Net model only, as the U-Net model being quantized would result in the most performance gains compared to the text encoders or autoencoders.
To quantize accurately, Quark needs to observe the inputs the U-Net
actually sees during a pipeline run (the noisy latents, the timestep,
and the text-conditioning embeddings). Rather than building these
tensors by hand, Quark provides get_calib_dataloader, which hooks
into the pipeline, runs it over a handful of calibration prompts, and
captures the U-Net’s inputs automatically. Each captured sample is a
dictionary keyed by the U-Net’s forward parameter names, which
ModelQuantizer.quantize_model consumes directly.
We can use a few hand-written prompts for calibration – no gated
datasets or Hugging Face login required. More prompts and more denoising
steps give more calibration samples (len(prompts) * n_steps total);
a handful is enough for this tutorial.
Collect calibration data by running the pipeline over a few prompts:
from quark.torch.utils.diffusers import get_calib_dataloader

calib_prompts = [
    "A serene lake reflecting mountains at sunset",
    "A futuristic city with flying cars at night",
    "A close-up portrait of a person with dramatic lighting",
]

calib_dataloader = get_calib_dataloader(pipe, pipe.unet, calib_prompts, n_steps=20, guidance_scale=7.5)
Now, we can finally quantize our diffusion model! Run the below script:
from quark.torch import ModelQuantizer

quantizer = ModelQuantizer(quant_config)
quant_model = quantizer.quantize_model(pipe.unet, calib_dataloader)
Let’s test our model by generating an image using the same prompt from earlier. We can compare the results we generated previously on our non-quantized model, to see if there is a significant degradation in quality. Note the difference in runtime compared to the non-quantized model; it should be much faster to run our quantized version.
pipe.unet = quant_model
device = "cuda" if torch.cuda.is_available() else "cpu"

generator = torch.Generator(device).manual_seed(1024)
q_images = pipe(prompt, num_inference_steps=50, guidance_scale=7.5, generator=generator).images

q_grid = image_grid(q_images, rows=1, cols=3)
q_grid
You can run the below line to save our results:
grid.save("rabbit-quant.png")
When we compare the two images generated by our quantized vs. unquantized model, we notice slight differences in the images, but not a signficantly noticeable degregation in quality, despite it’s lower precision:
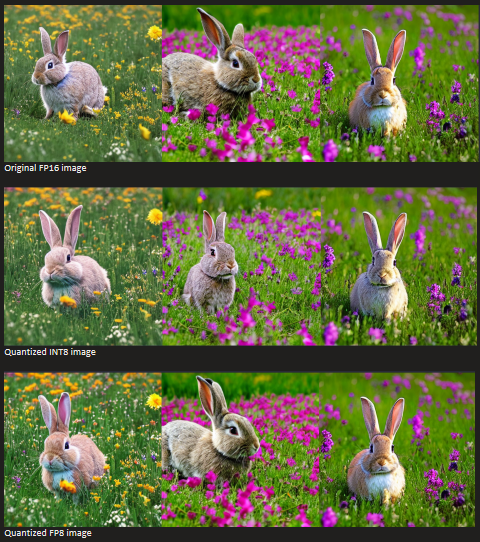
compare_quant#
In fact, the bottom image, fp8 is half the precision of the original
image, fp16, and yet images 2 and 3 are virtually identical. The
int8 images have slight variations; this is because the range of
numbers able to be represented by int8 is significantly smaller
compared to fp8 or fp16, making it a smaller, faster model, with
a slightly worse quality image generation.
Exporting with ONNX#
Let’s export our model. In this section, we will be saving our model
using ONNX, which allows different deep learning frameworks such as
PyTorch to store model data in a common format to transfer the models
between various frameworks. Alternatively, you can check out the Please
note that if you have changed the model from the original
stable-diffusion-v1-5/stable-diffusion-v1-5, you will have to change
the input tensor for exporting.
import os

from quark.torch import export_onnx

frozen_quantized_model = quantizer.freeze(quant_model)

# Dummy inputs
batch_size = 1
latent = torch.randn(batch_size, 4, 64, 64, dtype=torch.float16)
latent = latent.to(device)
timestep = torch.tensor([1], dtype=torch.float16)
timestep = timestep.to(device)
encoder_hidden_states = torch.randn(batch_size, 77, 768, dtype=torch.float16)
encoder_hidden_states = encoder_hidden_states.to(device)
input_args = (latent, timestep, encoder_hidden_states)
quant_model = quant_model.to(device)

quant_model.eval()


export_path = "export_path/"
os.makedirs(export_path, exist_ok=True)
export_onnx(frozen_quantized_model, export_path, input_args)
We can visualize our quantized model using netron. Run the below
script to display the quantized model:
import netron

netron.start("export_path/quark_model.onnx", address=8080)
Here’s a section of the diagram which should appear:
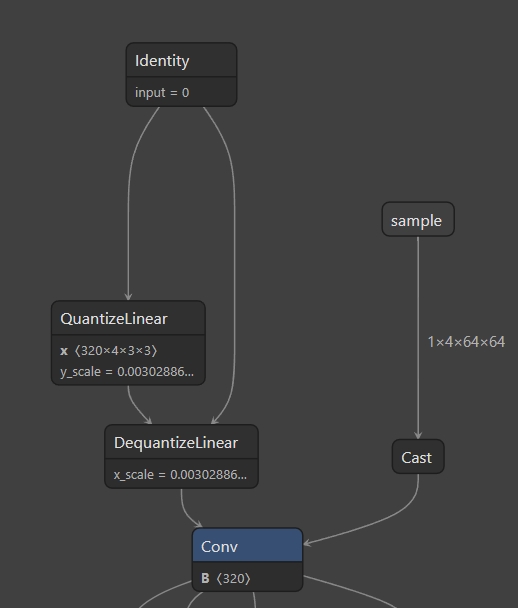
netron#
The diagram is quite large, so you should zoom in to see individual blocks.
Note how the model has a quantization and dequantization block in the model diagram. This is because the model is not actually quantized, but instead is pseudo quantized with a lower-precision stored into the same higher-precision data type the original model had. This means our models are not actually compressed in size, but as the precision is still smaller, just with trailing zeros.
Next Steps#
In the next tutorial, we will be quantizing Hugging Face Large Language Models, exporting them using safetensors and ONNX, evaluating their performance using benchmarks, and comparing the model size difference to the original model.
Further Reading#
Papers#
Deep Unsupervised Learning using Nonequilibrium Thermodynamics
The original diffusion model paper
Denoising Diffusion Probabilistic Models
Improvements to diffusion model image generation
Tutorials#
Hugging Face Diffusers Tutorial
For more in-depth background regarding diffusion models
Optimum Inference with ONNX Runtime
For running inference on an ONNX diffusion model