Power-of-Two Scales (Xint8) Quantization#
Note
In this documentation, AMD Quark is sometimes referred to simply as “Quark” for ease of reference. When you encounter the term “Quark” without the “AMD” prefix, it specifically refers to the AMD Quark quantizer unless otherwise stated. Please do not confuse it with other products or technologies that share the name “Quark”.
Introduction#
XINT8 is a specialized INT8 quantization configuration for Ryzen AI NPU. It uses symmetric INT8 input_tensors, weight and bias quantization with power-of-two scales. XINT8 is optimized for peak performance on the Ryzen AI NPU, fully leveraging its acceleration capabilities. However, due to the constraints of symmetric quantization and power-of-two scaling, some models may experience accuracy loss. This guide explains how to quantize a float model using the XINT8 configuration and provides strategies to improve its accuracy.
How to Quantize a Float Model with XINT8 Config#
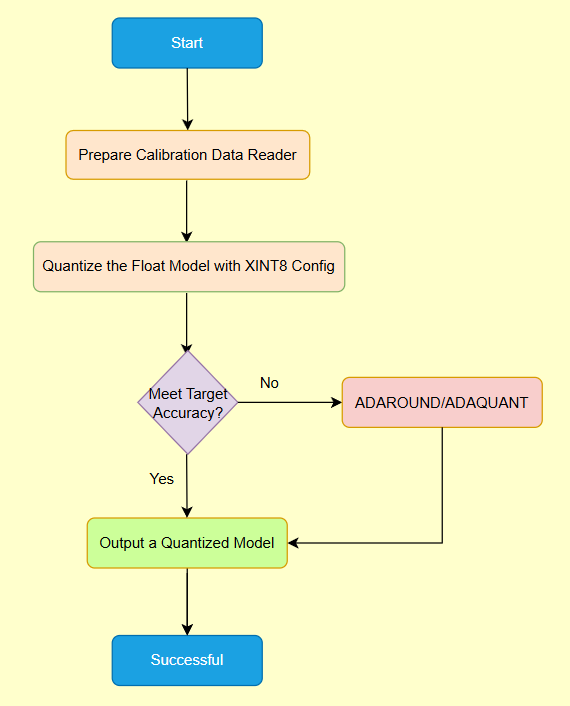
Figure 1. How to Quantize a Float Model with XINT8 Config#
As the Figure 1 shows, you can refer to codes below:
from quark.onnx import ModelQuantizer, QConfig

 # Define model paths
 # Path to the float model to be quantized
 float_model_path = "path/to/float_model.onnx"
 # Path where the quantized model will be saved
 quantized_model_path = "path/to/quantized_model.onnx"
 calib_data_folder = "path/to/calibration_data"
 model_input_name = 'model_input_name'

 # Define calibration data reader for static quantization
 class CalibDataReader(CalibrationDataReader):
     def __init__(self, calib_data_folder: str, model_input_name: str):
         self.input_name = model_input_name
         self.data = self._load_calibration_data(calib_data_folder)
         self.data_iter = None

     # Customize this function to preprocess calibration datasets as needed
     def _load_calibration_data(self, data_folder: str):
         # Example: Implement the actual data preprocessing here
         processed_data = []
         """
         Define preprocessing steps for your dataset.
         For instance, read images and apply necessary transformations.
         """
         return processed_data

     def get_next(self):
         if self.data_iter is None:
             self.data_iter = iter([{self.input_name: data} for data in self.data])
         return next(self.data_iter, None)

 # Instantiate the calibration data reader
 calib_data_reader = CalibDataReader(calib_data_folder, model_input_name)

 # Set up quantization with a specified configuration
 # For example, use "XINT8" for Ryzen AI INT8 quantization
 quantization_config = QConfig.get_default_config("XINT8")
 quantizer = ModelQuantizer(quantization_config)

 # Quantize the ONNX model and save to specified path
 quantizer.quantize_model(float_model_path, quantized_model_path, calib_data_reader)
Note
In the quantization, graph optimization will be automatically performed.
How to Measure Accuracy (Compare Differences between FP32 and XINT8)#
infer float32 and xint8 quantized models and save results
You can refer to the following code to infer the float32 and xint8 quantized models and save the results.
import numpy as np
import os
import onnxruntime as ort

def infer_model_and_save_output(onnx_model_path, input_data_loader, output_dir):
    ort_session = ort.InferenceSession(onnx_model_path)
    # Assume the model has only one input.
    input_name = ort_session.get_inputs()[0].name
    for index, input_data in enumerate(input_data_loader):
        ort_inputs = {input_name: input_data}
        ort_outs = ort_session.run(None, ort_inputs)
        output_numpy = ort_outs[0]
        os.makedirs(output_dir, exist_ok=True)
        output_file = os.path.join(output_dir, str(index) + ".npy")
        np.save(output_file, output_numpy)
    print(f"Results saved to {output_dir}.")


onnx_model_path = "float32_model.onnx" # Replace with "xint8_quantized_model.onnx"
# input_data_loader is an iterable object that returns a numpy tensor each time. It is user-defined.
output_dir = "baseline_results" # Replace with "quantized_results"
infer_model_and_save_output(onnx_model_path, input_data_loader, output_dir)
calculate differences
If you need to compare the differences between float32 and xint8 quantized models after conversion. We support some metrics (cosine similarity, L2 loss, PSNR) for comparing differences between float32 and xint8 quantized inference results. The formats (JPG, PNG and NPY) of inference result in folders are supported. you can use this command to compare:
python -m quark.onnx.tools.evaluate.py --baseline_results_folder $BASELINE_RESULTS_FOLDER_PATH --quantized_results_folder $QUANTIZED_RESULTS_FOLDER_PATH
How to Improve Quantization Accuracy#
If the accuracy of xint8 quantized model can not meet your target, you can improve quantization accuracy with adaround and adaquant finetuning. Here is examples of how to improve quantization accuracy with finetuning. For more detailed information, see Quantization Using AdaQuant and AdaRound.
ADAROUND
from quark.onnx import ModelQuantizer, QConfig

quantization_config = QConfig.get_default_config("XINT8_ADAROUND_CONFIG")
quantizer = ModelQuantizer(config)
quantizer.quantize_model(input_model_path, output_model_path, data_reader)
ADAQUANT
from quark.onnx import ModelQuantizer, QConfig

quantization_config = QConfig.get_default_config("XINT8_ADAQUANT_CONFIG")
quantizer = ModelQuantizer(config)
quantizer.quantize_model(input_model_path, output_model_path, data_reader)