AMD Quark for ONNX#
The Getting started with AMD Quark guide provides a general overview of the quantization process, irrespective of specific hardware or deep learning frameworks. This page details the features supported by the Quark ONNX Quantizer and explains how to use it to quantize ONNX models.
Basic Example#
Here is an introductory example of ResNet50 to run a quantization. We are following the basic quantization steps from the Getting Started page.
1. Prepare the original float model#
Download the ONNX float model from the onnx/models repo directly:
wget -P models https://github.com/onnx/models/raw/new-models/vision/classification/resnet/model/resnet50-v1-12.onnx
Note
Please refer to Shapeshifter if you want to apply custom preprocessing to the float model, such as converting NCHW to NHWC or upgrading the opset version. And set SkipPreprocess as True if Shapeshifter is used before quantization. For more details about this parameter, please refer to Full List of Quantization Config Features
2. Prepare calibration data#
You can provide a folder containing PNG or JPG files as calibration data folder. For example, you can download images from microsoft/onnxruntime-inference-examples as a quick start.
mkdir calib_data
wget -O calib_data/daisy.jpg https://github.com/microsoft/onnxruntime-inference-examples/blob/main/quantization/image_classification/cpu/test_images/daisy.jpg?raw=true
We will use the OpenCV library to read images.
pip install opencv-python
Next, you can refer to the following code to construct a calibration data reader class.
import os
import cv2
import onnx
import copy
import numpy as np
from onnxruntime.quantization import CalibrationDataReader

def get_model_input_name(input_model_path: str) -> str:
    model = onnx.load(input_model_path)
    model_input_name = model.graph.input[0].name
    return model_input_name

class ImageDataReader(CalibrationDataReader):

    def __init__(self, calibration_image_folder: str, input_name: str):
        self.enum_data = None

        self.input_name = input_name

        self.data_list = self._preprocess_images(
                calibration_image_folder)

    def _preprocess_images(self, image_folder: str):
        data_list = []
        img_names = [f for f in os.listdir(image_folder) if f.endswith('.png') or f.endswith('.jpg')]
        for name in img_names:
            input_image = cv2.imread(os.path.join(image_folder, name))
            # Resize the input image. Because the size of Resnet50 is 224.
            input_image = cv2.resize(input_image, (224, 224))
            input_data = np.array(input_image).astype(np.float32)
            # Custom Pre-Process
            input_data = input_data.transpose(2, 0, 1)
            input_size = input_data.shape
            if input_size[1] > input_size[2]:
                input_data = input_data.transpose(0, 2, 1)
            input_data = np.expand_dims(input_data, axis=0)
            input_data = input_data / 255.0
            data_list.append(input_data)

        return data_list

    def get_next(self):
        if self.enum_data is None:
            self.enum_data = iter([{self.input_name: data} for data in self.data_list])
        return next(self.enum_data, None)

    def rewind(self):
        self.enum_data = None
3. Set the quantization configuration#
While Quark ONNX provides a granular API to handle diverse quantization scenarios, it also offers streamlined APIs for common use cases. The example below demonstrates this simplified approach.
from quark.onnx import QConfig

# Set up quantization with a specified configuration
# For example, use "A8W8" for Ryzen AI INT8 quantization
quantization_config = QConfig.get_default_config("A8W8")
Note
The A8W8 configuration is our default setup. To minimize quantization time, accuracy-improvement strategies such as AdaRound or AdaQuant are not applied by default, which may lead to suboptimal accuracy in some cases. For better quantization accuracy, please refer to Section How to Improve Quantization Accuracy of Float Scales (A8W8 and A16W8) Quantization page for details.
4. Quantize the model#
Once the model, input data, and quantization configuration are ready, quantizing the model is straightforward, as shown below:
from quark.onnx import ModelQuantizer

input_model_path = "models/resnet50-v1-12.onnx"
quantized_model_path = "models/resnet50-v1-12_quantized.onnx"
calib_data_path = "calib_data"
model_input_name = get_model_input_name(input_model_path)
calib_data_reader = ImageDataReader(calib_data_path, model_input_name)

quantizer = ModelQuantizer(quantization_config)
quantizer.quantize_model(input_model_path, quantized_model_path, calib_data_reader)
The screenshots of the ResNet50 before and after quantization, viewed with Netron (https://netron.app), are shown in Figure 1. The original float model is shown on the left-hand side, and the right-hand side shows the “a8w8” quantized model.
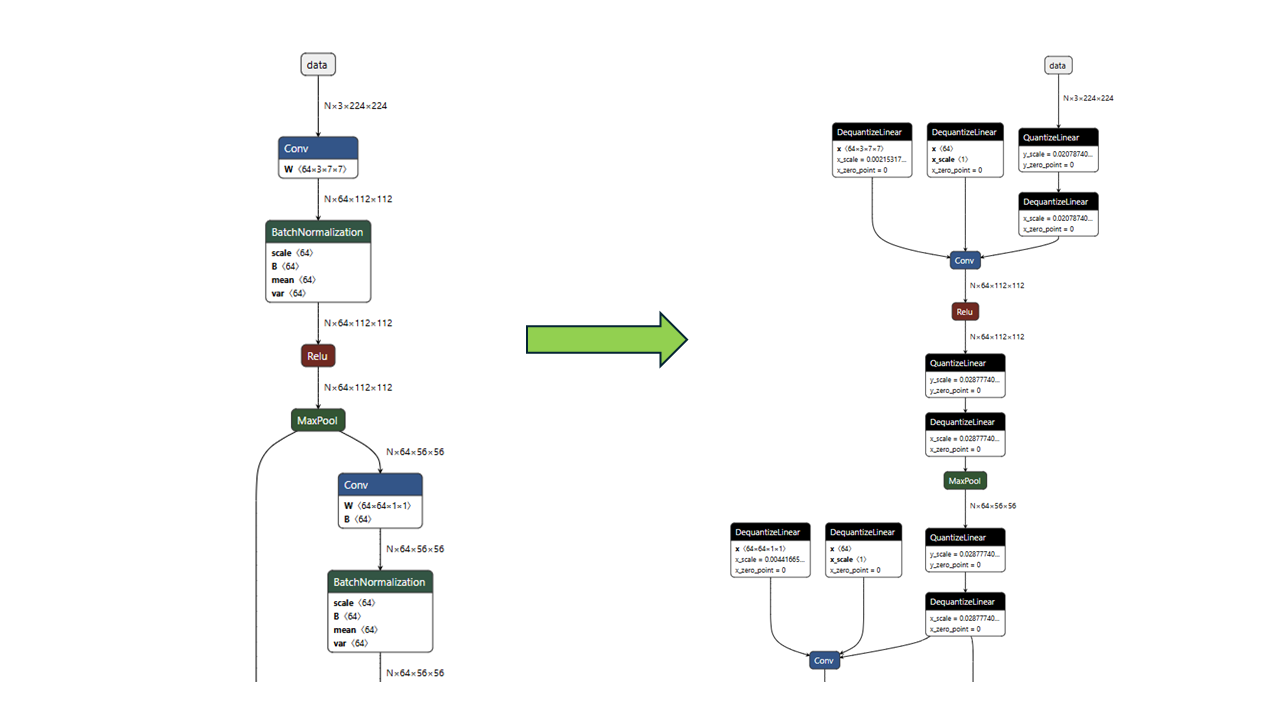
Figure 1. Float and A8W8 Quantized ResNet50#
Note
During quantization, graph optimization will be automatically performed. The image above shows Batch Normalizations are automatically folded into the Convs.
Further reading#
Ryzen AI support: Refer to Ryzen AI page to learn how to seamlessly integrate Quark and Ryzen AI for the best performance and compatibility!
Quantized models can be evaluated to compare its performance with the original model. Learn more on Model Evaluation.
Quark’s Advanced Features can help you quantize more complex ONNX models.