Auto-Search for Ryzen AI Resnet50 ONNX Model Quantization#
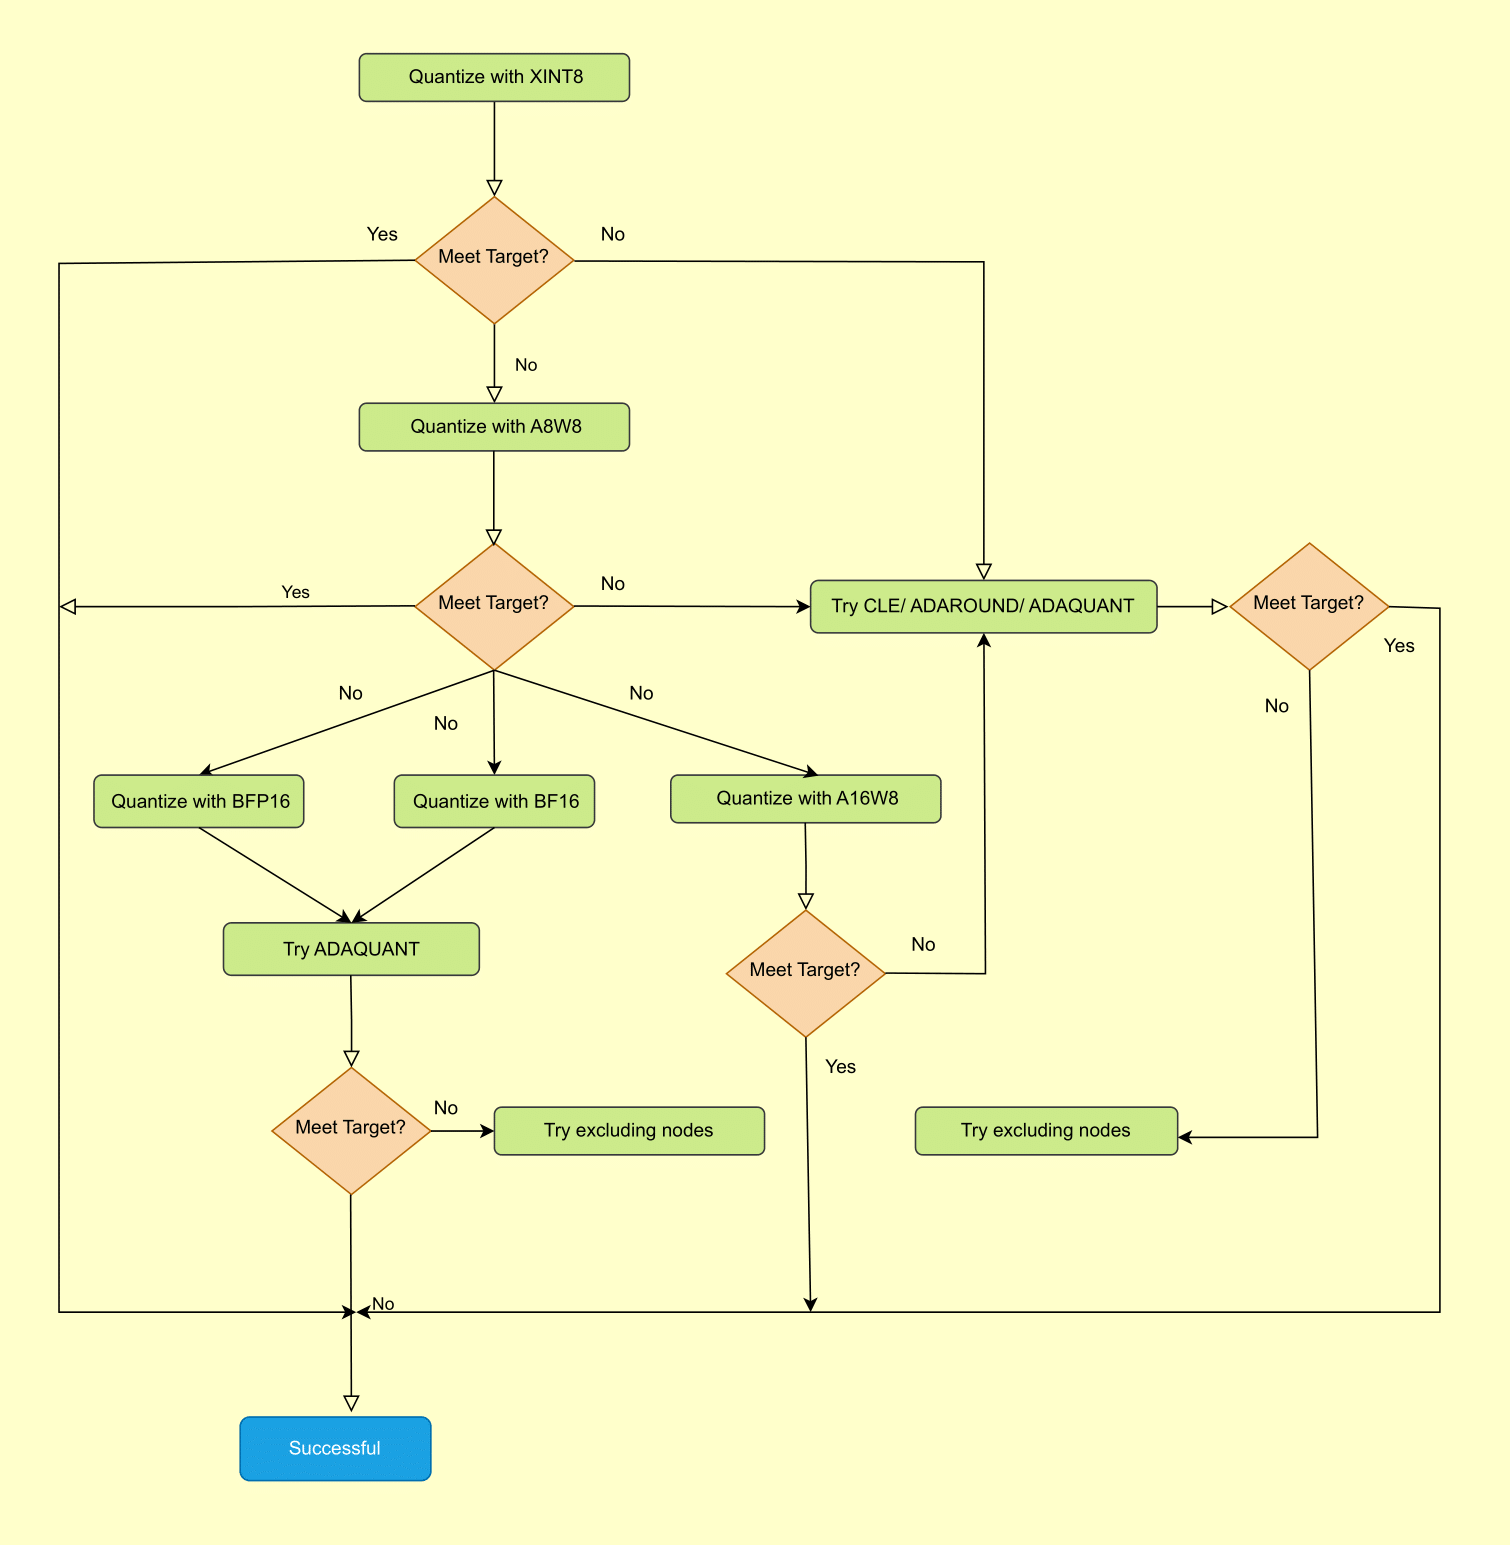
This topic outlines best practice for Post-Training Quantization (PTQ) in Quark ONNX. It provides guidance on fine-tuning your quantization strategy to meet target quantization accuracy.

Figure 1. Best Practices for Quark ONNX Quantization#
Pip Requirements#
Install the necessary python packages:
python -m pip install -r requirements.txt
Prepare model#
Download the ONNX float model from the onnx/models repo directly:
wget -P models https://github.com/onnx/models/raw/new-models/vision/classification/resnet/model/resnet50-v1-12.onnx
Prepare Calibration Data#
You can provide a folder containing PNG or JPG files as calibration data folder. For example, you can download images from microsoft/onnxruntime-inference-examples as a quick start. Specifically, you can provide the preprocessing code at line 63 in quantize_quark.py
mkdir calib_data
wget -O calib_data/daisy.jpg https://github.com/microsoft/onnxruntime-inference-examples/blob/main/quantization/image_classification/cpu/test_images/daisy.jpg?raw=true
Auto search for AMD Ryzen AI quantization#
- build search space
Search space is a set of parameters to define the searching item. In the search space, we will list out all the possible combination of the config. An example is like below:
search_space_advanced: dict[str, any] = {
     "calibrate_method": [CalibrationMethod.MinMax, CalibrationMethod.Percentile],
     "activation_type": [QuantType.QInt8, QuantType.QInt16,],
     "weight_type": [QuantType.QInt8,],
     "include_fast_ft": [False, True],
     "extra_options": {
         'ActivationSymmetric': [True, False],
         'WeightSymmetric': [True],
         'FastFinetune': {
             'DataSize': [200,],
             'NumIterations': [1000],
             'OptimAlgorithm': ['adaround'],
             'LearningRate': [0.1],
             'OptimDevice': ['cuda:0'],
             'InferDevice': ['cuda:0'],
             'EarlyStop': [False],
             }
         }
}
When needing build more than one search space, you can build many space according to your preference and concatenate all of them:
space1 = auto_search_ins.build_all_configs(auto_search_config.search_space_XINT8)
space2 = auto_search_ins.build_all_configs(auto_search_config.search_space)
auto_search_ins.all_configs = space1 + space2
evaluator
Evaluator is a custom function which use the onnx model as input and output the metric. Based on this metric and the metric drop tolerance, auto search decide wether to stop the searching process. If set None, auto search will call the build-in evaluator.
There are two ways to define evaluator function: - defined in auto_search_config as a static method:
class AutoSearchConfig_Default:
    # 1) define search space
    # 2) define search_metric, search_algo
    # 3) define search_metric_tolerance, search_cache_dir, etc

    @staticmethod
    def custom_evaluator(onnx_path, **args):
        # step 1) build onnx inference session
        # step 2) model post-processing if needed
        # step 3) build evaluation dataloader
        # step 4) calculate the metric
        # step 5) clean cache if needed
        # step 6) return the metric

    search_evaluator = custom_evaluator
instance a auto_search_config and assign the evaluator function:
def custom_evaluator(onnx_path, **args):
         # step 1) build onnx inference session
         # step 2) model post-processing if needed
         # step 3) build evaluation dataloader
         # step 4) calculate the metric
         # step 5) clean cache if needed
         # step 6) return the metric

auto_search_config = AutoSearchConfig_Default()
auto_search_config.search_evaluator = custom_evaluator
metric
If evaluator is not None, metric is defined in the evaluator. If evaluator is None, we can support the metrics such as “L2”, “L1”, “cos”, “psnr” and “ssim”. Default is “L2”.
target setting
Target setting is the acceptable drop of metric. For example, we can set the search metric is “L2”. And the target is the L2 distance between float model and quantized model is within 0.1.
search_metric: str = "L2"
search_metric_tolerance: float = 0.1
stop condition
When target meets, the search process will stop and save the searched result.
execution
Auto search execution command:
python quantize_quark.py --input_model_path models/resnet50-v1-12.onnx --calib_data_path calib_data --output_model_path models